Gradle+组件化开发
Gradle
gradle_3">一.什么是gradle?
Gradle是一个基于JVM的构建工具,其 build 脚本使用 groovy dsl 编写。
Gradle 的核心在于基于 Groovy的丰富而可扩展的域描述语言(DSL)。 Groovy 通过声明性的语言元素将基于声明的构建推向下层,你可以按你想要的方式进行组合。
gradle_8">二.gradle优势
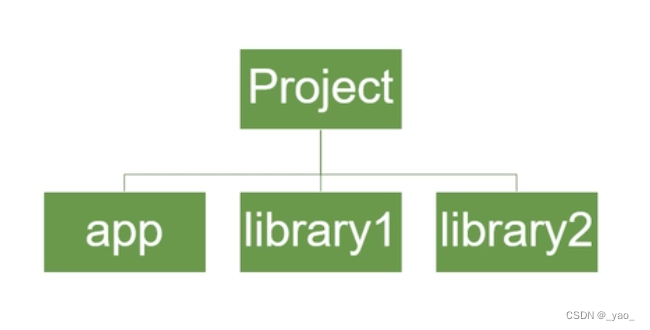
三.project和module的关系
一个project里面可以有多个module,module可以是application,也可以是library。
plugins {
    id 'com.android.library'
    id 'org.jetbrains.kotlin.android'
}
plugins {
    id 'com.android.application'
    id 'org.jetbrains.kotlin.android'
}
application中引用library
implementation project(':library-network')
gradlemodulegradle_31">三.project.gradle和module.gradle的区别
1.setttings.gradle是project级别
pluginManagement {
    repositories {
    //插件仓库地址
        gradlePluginPortal()
        google()
        mavenCentral()

    }
}
dependencyResolutionManagement {
  repositoriesMode.set(RepositoriesMode.FAIL_ON_PROJECT_REPOS)
    repositories {//依赖的远程仓库地址
        google()
        mavenCentral()
        //国内仓库
        maven {
            url 'https://maven.aliyun.com/repository/google'
        }
        maven {
            url 'https://maven.aliyun.com/repository/gradle-plugin'
        }
        maven {
            url 'https://maven.aliyun.com/repository/jcenter'
        }
        maven {
            url 'https://maven.aliyun.com/repository/public'
        }
        maven {
            url 'https://maven.aliyun.com/repository/central'
        }
        maven {
            url 'https://plugins.gradle.org/m2/com/gradle'
        }
        maven { url 'https://jitpack.io' }
    }
}
//项目名称
rootProject.name = "openEye"
//module
include ':app'
include ':library-base'
include ':library-common'
include ':library-network'
include ':library-video'
include ':library-widget'
include ':module-main'
include ':module-home'
include ':module-community'
include ':module-more'
include ':module-player'
include ':module-user'
2.project.gralde文件插件
plugins {
    id 'com.android.application' version '7.2.1' apply false //application插件
    id 'com.android.library' version '7.2.1' apply false//library插件
    id 'org.jetbrains.kotlin.android' version '1.6.10' apply false//kotlin插件
    id 'com.google.dagger.hilt.android' version '2.44' apply false //依赖注入插件
}

task clean(type: Delete) {
    delete rootProject.buildDir
}
3.module.gralde文件
plugins {
//使用插件
    id 'com.android.application'
    id 'org.jetbrains.kotlin.android'
    id 'com.google.dagger.hilt.android' //hilt插件
    id 'kotlin-kapt'//kotlin注解
}
//签名密钥
def keystorePropertiesFile = rootProject.file("keystore.properties")
def keystoreProperties = new Properties()
keystoreProperties.load(new FileInputStream(keystorePropertiesFile))

android {
//
    compileSdk Versions.compileSdk

    defaultConfig {
        applicationId Versions.applicationId
        minSdk Versions.minSdk
        targetSdk Versions.targetSdk
        versionCode Versions.versionCode
        versionName Versions.versionName

        testInstrumentationRunner "androidx.test.runner.AndroidJUnitRunner"
    }
    //签名配置
    signingConfigs {
        release {
            keyAlias keystoreProperties['keyAlias']
            keyPassword keystoreProperties['keyPassword']
            storeFile file(keystoreProperties['storeFile'])
            storePassword keystoreProperties['storePassword']
        }
    }
    //打包时候代码混淆以及对应的混淆规则以及签名配置
    //release 发布版本 debug调试版本
    buildTypes {
        release {
            minifyEnabled true //开启混淆
            shrinkResources true //移除未使用资源
            proguardFiles getDefaultProguardFile('proguard-android-optimize.txt'), 'proguard-rules.pro'
            signingConfig signingConfigs.release//设置使用的签名
        }
    }
    //编辑的jdk版本
    compileOptions {
        sourceCompatibility JavaVersion.VERSION_1_8
        targetCompatibility JavaVersion.VERSION_1_8
    }
    //kotlin jvm版本
    kotlinOptions {
        jvmTarget = '1.8'
    }
    sourceSets {
        main{
            if (isModule.toBoolean()){
                //单独运行
                manifest.srcFile 'src/main/alone/AndroidManifest.xml'
            }
            else {
                //合并到宿主中
                manifest.srcFile 'src/main/AndroidManifest.xml'
                resources{
                    //正式版本时.剔除debug文件夹下的所有调式文件
                    exclude 'src/debug/*'
                }
            }
        }
    }
    //统一资源前缀,规范资源引用
    resourcePrefix "app_"
    //开启dataBinding
    dataBinding{
        enabled true
    }


}
//依赖
dependencies {

    implementation Libs.coreKtx
    implementation Libs.appcompat
    implementation Libs.material
    implementation Libs.constraintlayout
    testImplementation Libs.junit
    androidTestImplementation Libs.junitTest
    androidTestImplementation Libs.espresso_core

    implementation project(':library-network')
依赖的添加:分为依赖本地SDK、依赖本地module、依赖远程库
implementation fileTree(dir: 'libs', include: ['*.aar', '*.jar'], exclude: [])//依赖libs目录下的所有相关类型文件
implementation project(path: ':ZXingForAndroid')//依赖本地module
implementation files('libs/Msc.jar')//依赖本地库
//远程依赖库
implementation('com.alibaba:QLExpress:3.2.0'){exclude group: 'com.android.support', module:'design' }// 加载时排除框架中的design包
defaultConfig块
    compileSdk Versions.compileSdk
    defaultConfig {
        applicationId Versions.applicationId
        minSdk Versions.minSdk
        targetSdk Versions.targetSdk
        versionCode Versions.versionCode
        versionName Versions.versionName

        testInstrumentationRunner "androidx.test.runner.AndroidJUnitRunner"
    }
compileSdk:编译代码所需要的sdk版本,要与sdk manager里main下载的sdk platforms对应,也就是compileSdk使用的版本必须在sdk manager中已经下载了
minSdk:app可运行的手机设本的最小版本
targetSdk:标识该app是为某个版本的额手机设备而设计的,在这个目标版本的手机上做了充分测试。
buildTypes块:用于构建不同的apk
buildTypes {
        release {
            minifyEnabled true //开启混淆
            shrinkResources true //移除未使用资源
            proguardFiles getDefaultProguardFile('proguard-android-optimize.txt'), 'proguard-rules.pro'
            signingConfig signingConfigs.release //设置使用的签名
        }
        debug {
            debuggable true
        }
        custom {
            minifyEnabled false
        }
    }
signingConfig块:签名
    signingConfigs {
        debug {//可以在bulidTypes下的signingConfig中引用
            storeFile file('release.keystore')//签名文件路径
            storePassword 'xxxxxx'
            keyAlias 'androidreleasekey'
            keyPassword '123456'
        }
        release {
            storeFile file('release.keystore')
            storePassword 'xxxxxx'
            keyAlias 'androidreleasekey'
            keyPassword '123456'
        }
    }
productFlavors 多渠道打包配置
    flavorDimensions 'default' // 定义产品维度,所有渠道都要指定维度
    productFlavors {
        dev {// 每个环境包名不同
            applicationId DEVELOP_PACKAGE_NAME as String
            dimension "default"
            // 自定义buildConfig.java中的变量供代码中使用
            buildConfigField "String", "MODE", '"develop"'
        }
        prod {
            applicationId PROD_PACKAGE_NAME as String
            dimension "default"
            buildConfigField "String", "MODE", '"production"'
        }


        productFlavors.all { flavor ->
            flavor.manifestPlaceholders += [CHANNEL_VALUE: name]
            if (name.equals('dev')) { //开发环境
                flavor.manifestPlaceholders += [APP_NAME: DEV_APP_NAME as String]
                flavor.manifestPlaceholders += [APP_ICON: DEV_APP_ICON as String]
                flavor.manifestPlaceholders += ["apk.applicationId" : DEV_PACKAGE_NAME as String]
            } else if (name.equals('prod')) { //生产环境
                flavor.manifestPlaceholders += [APP_NAME: PROD_APP_NAME as String]
                flavor.manifestPlaceholders += [APP_ICON: PROD_APP_ICON as String]
                flavor.manifestPlaceholders += ["apk.applicationId" : PROD_PACKAGE_NAME as String]
            }

            //打包配置
            applicationVariants.all { variant ->
                def name = variant.flavorName
                variant.outputs.all {//设置输出apk的文件名
                    if (name.equals('dev')){
                        outputFileName = "app-debug-${variant.versionName}.apk"
                    }else if (name.equals('prod')) {
                        outputFileName = "app-prod-${variant.versionName}.apk"
                    }
                }
            }
        }

    }
SourceSets配置
    sourceSets {
        main {
            manifest.srcFile 'AndroidManifest.xml'
            java.srcDirs = ['src']
            resources.srcDirs = ['src']
            aidl.srcDirs = ['src']
            renderscript.srcDirs = ['src']
            res.srcDirs = ['res']
            assets.srcDirs = ['assets']
            jniLibs.srcDirs = ['src/main/jniLibs']
            java {
                exclude '/test/**'  // 不想包含文件的路径
            }
        }
    }
可以加逻辑判断,比如通过flag判断使用哪个manifest,组件化开发的时候使用到
    sourceSets {
        main {
            if (DEBUG) {
                manifest.srcFile 'src/main/debug/AndroidManifest.xml'
            } else {
                manifest.srcFile 'src/main/AndroidManifest.xml'
            }
        }
    }
NDK配置:NDK和JNI后面讲解
1)defaultConfig{}中的 ndk.abiFilters 属性,配置ndk链接库支持的cpu架构
2)externalNativeBuild{}中配置cmake
    externalNativeBuild {
        cmake {
            path "CMakeLists.txt"
            cppFlags '-std=c++11'
            arguments '-DANDROID_PLATFORM=android-21',
                    '-DANDROID_TOOLCHAIN=clang',
                    '-DANDROID_STL=c++_shared'
        }
    }
3)sourceSets中配置动态链接库的目录
    sourceSets {
        main {
            jniLibs.srcDirs = ['src/main/jniLibs']
        }
    }
4)android{}中的ndkVersion 属性,配置ndk版本号
发布到局域网私有仓库在要发布的module的bulid.gradle中添加配置
apply plugin: 'maven'
//...其它配置
//将源码打包  为了保证引入的aar  包可以查看源码
task androidSourcesJar(type: Jar) {
    classifier = 'sources'
    from android.sourceSets.main.java.srcDirs
}
//包含文档和源码的aar
artifacts {
    archives androidSourcesJar
}
//上传到Maven仓库的task
uploadArchives {
    repositories {
        mavenDeployer {
            //指定maven仓库url
            repository(url: "http://10.10.25.223:8081/repository/maven-releases/") {
                //nexus登录默认用户名和密码
                authentication(userName: "admin", password: "123456")
            }
            pom.groupId = "com.test.camera"// 唯一标识(通常为模块包名,也可以任意)
            pom.artifactId = "CameraMix" // 项目名称(通常为类库模块名称,也可以任意)
            pom.version = "1.0.0" // 版本号
        }
    }
}
组件化开发
视频学习:https://www.bilibili.com/video/BV1oK4y1R7Hx/?spm_id_from=333.337.search-card.all.click&vd_source=d61c44703fccc74954c692402d0116b8
一.背景
一个app随着业务增加,代码放在同一个模块中会越来越臃肿,同时也导致多人开发的一个难度。组件化可以把业务单独分出来,形成一个单独模块,可单独运行、测试等,相互之间不会影响。
另外一个优势,如果一个公司有多个app,总会出现一些相同业务,如登录/注册。我们可以单独把公共业务封装成一个单独模块,供所以app使用,提高了开发成本
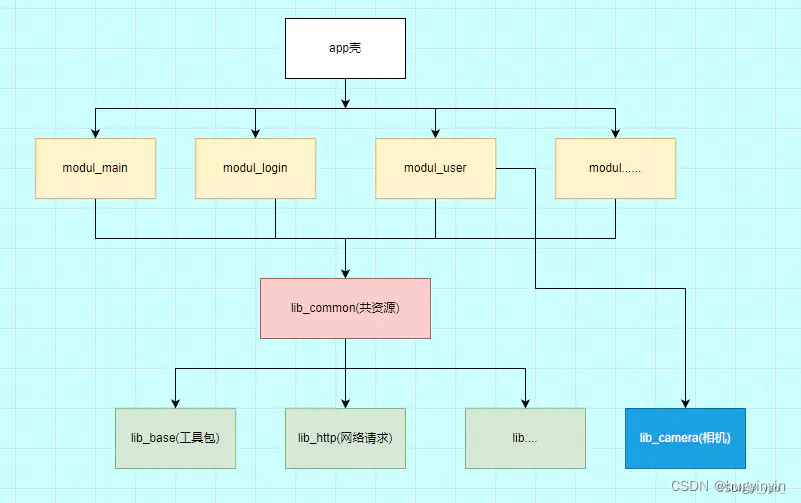
二.项目结构
如下图1:
项目分成了4层,第一层app壳,这个也就是我们主工程, 里面包含application,启动页,以及一些初始化操作。第二层为module层,也就是我们的具体业务模块,具体需要看业务。第三层公共资源库,所有module都依赖此lib库。第四层为工具层,我们可以封装一些常用的网络请求,图片框架等
三.组件开发代码配置
1.先给大家看下工程主要目录结构
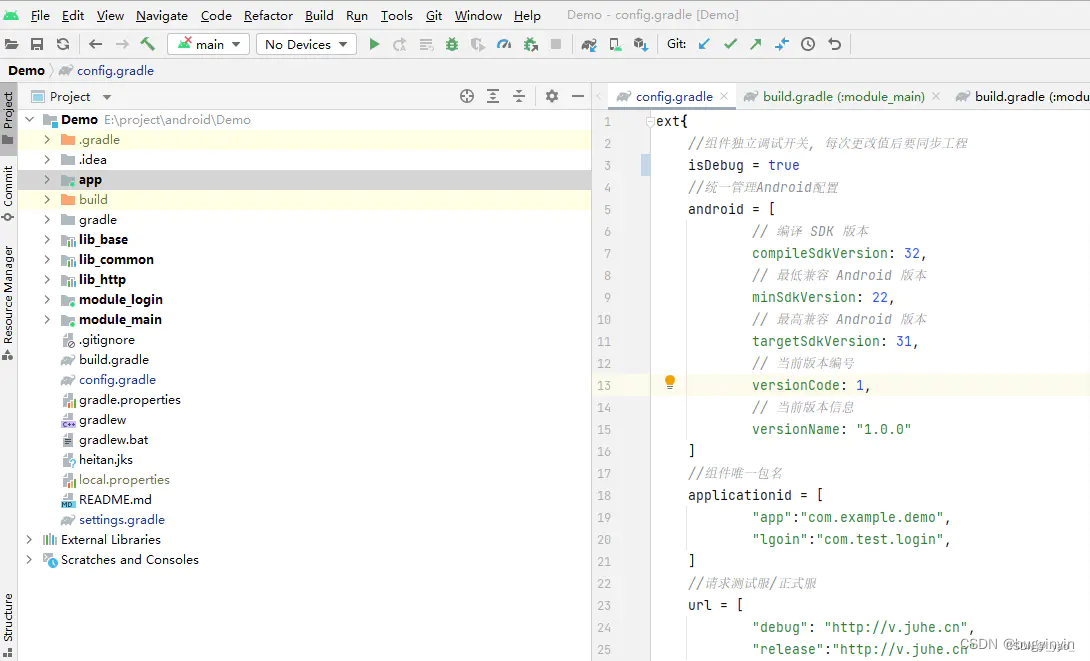
2.在project目录下创建一个全局的config.gradle配置文件。具体每个字段作用,看代码注释,这里就不作讲解了
ext{
    //组件独立调试开关, 每次更改值后要同步工程
    isDebug = false
    //统一管理Android配置
    android = [
            // 编译 SDK 版本
            compileSdkVersion: 32,
            // 最低兼容 Android 版本
            minSdkVersion: 22,
            // 最高兼容 Android 版本
            targetSdkVersion: 31,
            // 当前版本编号
            versionCode: 1,
            // 当前版本信息
            versionName: "1.0.0"
    ]
    //组件唯一包名
    applicationid = [
            "app":"com.example.demo",
            "lgoin":"com.test.login",
    ]
    //请求测试服/正式服
    url = [
            "debug": "http://v.juhe.cn",
            "release":"http://v.juhe.cn"
    ]
    //统一管理module的第三方依赖
    dependencies = [
            corektx: 'androidx.core:core-ktx:1.7.0',
            appcompat: 'androidx.appcompat:appcompat:1.3.0',
            material: 'com.google.android.material:material:1.4.0',
            constraintlayout: 'androidx.constraintlayout:constraintlayout:2.0.4',
            junit: 'junit:junit:4.13.2',
            junittest: 'androidx.test.ext:junit:1.1.3',
            espressocore: 'androidx.test.espresso:espresso-core:3.4.0',
    ]
    //路由
    libARouter= 'com.alibaba:arouter-api:1.5.2'
    libARouterCompiler = 'com.alibaba:arouter-compiler:1.5.2'
    //Gson解析
    libGson = 'com.google.code.gson:gson:2.8.9'
}
3.引入config.gradle配置文件,在project全局中build.grale文件添加 apply from:“config.gradle”
plugins {
    id 'com.android.application' version '7.2.1' apply false
    id 'com.android.library' version '7.2.1' apply false
    id 'org.jetbrains.kotlin.android' version '1.6.10' apply false
}

//引入config全局配置文件
apply from:"config.gradle"

task clean(type: Delete) {
    delete rootProject.buildDir
}
4.配置module,通过全局配置文件中的 isDebug 控制,来实现module和library之间的转换,我们对module中的build.grale文件作一下修改(这里修改的是module_login下面的)
apply from: '../config.gradle'
if (isDebug){
    apply plugin: 'com.android.application'
}else {
    apply plugin: 'com.android.library'
}
apply plugin:'org.jetbrains.kotlin.android'
apply plugin: 'kotlin-kapt'
android {
    compileSdk rootProject.ext.android.compileSdkVersion

    defaultConfig {
        if (isDebug){
            applicationId rootProject.ext.applicationid.lgoin
        }
        minSdk rootProject.ext.android.minSdkVersion
        targetSdk  rootProject.ext.android.targetSdkVersion
        versionCode  rootProject.ext.android.versionCode
        versionName rootProject.ext. android.versionName

        testInstrumentationRunner "androidx.test.runner.AndroidJUnitRunner"


        //kotlin 路由配置
        kapt {
            arguments {
                arg("AROUTER_MODULE_NAME", project.getName())
            }
        }
    }

    buildTypes {
        release {
            minifyEnabled false
            proguardFiles getDefaultProguardFile('proguard-android-optimize.txt'), 'proguard-rules.pro'
        }
    }
    compileOptions {
        sourceCompatibility JavaVersion.VERSION_1_8
        targetCompatibility JavaVersion.VERSION_1_8
    }
    sourceSets{
        main{
            if (isDebug){
                manifest.srcFile 'src/main/debug/AndroidManifest.xml'
            }else {
                manifest.srcFile 'src/main/AndroidManifest.xml'
            }
        }
    }
    kotlinOptions {
        jvmTarget = '1.8'
    }
}

dependencies {
    implementation rootProject.ext.dependencies.corektx
    implementation rootProject.ext.dependencies.appcompat
    implementation rootProject.ext.dependencies.material
    implementation rootProject.ext.dependencies.constraintlayout
    testImplementation rootProject.ext.dependencies.junit
    androidTestImplementation rootProject.ext.dependencies.junittest
    androidTestImplementation rootProject.ext.dependencies.espressocore
    implementation project(path: ':lib_common')

    //kotlin路由配置
    implementation rootProject.ext.libARouter
    kapt rootProject.ext.libARouterCompiler
}
5.添加AndroidManifest.xml文件,这里解释下为什么要添加AndroidManifest.xml。当module作为library库时,AndroidManifest.xml里面的内容是有区别的
- 作为library,目录位置src/main/AndroidManifest.xml
<?xml version="1.0" encoding="utf-8"?>
<manifest xmlns:android="http://schemas.android.com/apk/res/android"
    package="com.module.login">

    <application>
        <activity
            android:name="com.module.login.TestActivity" />
    </application>

</manifest>
- 作为module单独运行,目录位置src/main/debug/AndroidManifest.xml
<?xml version="1.0" encoding="utf-8"?>
<manifest xmlns:android="http://schemas.android.com/apk/res/android"
    package="com.module.login">
    <application
        android:allowBackup="true"
        android:icon="@mipmap/ic_launcher"
        android:label="@string/app_name"
        android:roundIcon="@mipmap/ic_launcher_round"
        android:supportsRtl="true"
        android:name="com.module.login.App"
        android:theme="@style/Theme.Demo">
        <activity
            android:name="com.module.login.TestActivity"
            android:exported="true">
            <intent-filter>
                <action android:name="android.intent.action.MAIN" />

                <category android:name="android.intent.category.LAUNCHER" />
            </intent-filter>
        </activity>
    </application>

</manifest>
6.完成上面几步,module_login模块就配置完了,其他module依照配置就可以了。另外需要注意,组件开发,一般会引入路由框架ARoute,实现模块之间的的跳转。
app模块以及所有的业务模块Arouter配置
common公共模块中配置路径,所有的业务模块均引用common公共模块
7.组件开发特别需要注意资源重名,为了避免这个问题,可以在module中的build.gradle中添加resourcePrefix “xxx_” 前缀提示,这样每次添加资源,系统会提示加前缀
四.BuildSrc组件化开发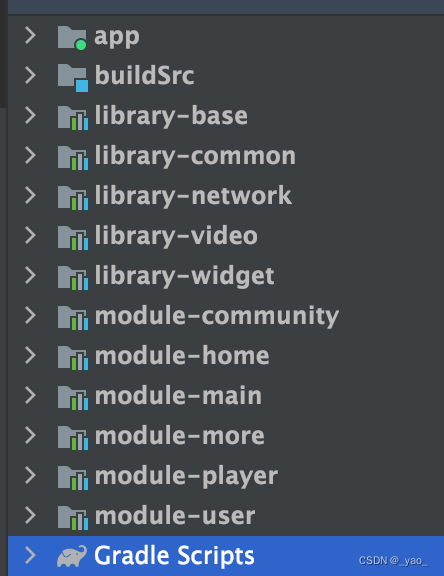
1.项目根目录下创建buildSrc文件夹并创建build.gralde.kts文件
plugins {
    `kotlin-dsl`
}

repositories {
    maven {
        setUrl("https://maven.aliyun.com/nexus/content/groups/public/")
    }
    mavenCentral()
    flatDir {
        dirs("libs")
    }
}
2.在buildSrc下创建src/main/java目录并创建一个kt文件,取名Dependencies.kt
//版本号管理
object Versions{
    const val applicationId = "com.bawei.openeye"
    const val compileSdk = 32
    const val targetSdk = 32
    const val minSdk = 23
    const val versionCode = 1
    const val versionName = "1.0"
    const val coreKtx = "1.7.0"
    const val appcompat = "1.3.0"
    const val material = "1.4.0"
    const val constraintlayout = "2.0.4"
    const val junit = "4.13.2"
    const val junitTest = "1.1.3"
    const val espresso_core = "3.4.0"
    const val room_version = "2.4.0"
    const val lifecycle_version = "2.5.1"
    const val glide = "4.11.0"
//    const val mmkv = "1.2.15"
    const val fragmentKtx = "1.5.5"
    const val retrofit2 = "2.9.0"
    const val utilcodex = "1.30.6"
    const val coroutines = "1.3.9"
    const val flycotablayout = "2.0.2@aar"
    const val banner = "1.4.10"
    const val okhttp = "3.4.1"
    const val okhttp_logging = "3.9.1"
    const val rxjava = "2.2.7"
    const val eventbus = "3.3.1"
    const val arouter  = "1.5.2"
    const val smart = "2.0.5"
    const val hilt = "2.44"
    const val loadsir = "1.3.6"
    const val rxpermissions = "0.10.2"
    const val rxjava2 = "2.2.7"
    const val immersionbar = "3.0.0"
    const val mmkv = "1.2.15"
}
object Libs{
    const val espresso_core = "androidx.test.espresso:espresso-core:${Versions.espresso_core}"
    const val coreKtx =  "androidx.core:core-ktx:${Versions.coreKtx}"
    const val appcompat =  "androidx.appcompat:appcompat:${Versions.appcompat}"
    const val material =  "com.google.android.material:material:${Versions.material}"
    const val constraintlayout =  "androidx.constraintlayout:constraintlayout:${Versions.constraintlayout}"
    const val junit =  "junit:junit:${Versions.junit}"
    const val junitTest =  "androidx.test.ext:junit:${Versions.junitTest}"
}
object Dependencies {
    //jetpack
    const val livedata = "androidx.lifecycle:lifecycle-livedata-ktx:${Versions.lifecycle_version}"
    const val viewmodel = "androidx.lifecycle:lifecycle-viewmodel-ktx:${Versions.lifecycle_version}"
    const val fragmentKtx = "androidx.fragment:fragment-ktx:${Versions.fragmentKtx}"
    const val roomKtx = "androidx.room:room-ktx:${Versions.room_version}"
    const val roomRxjava2 = "androidx.room:room-rxjava2:${Versions.room_version}"
    const val roomRuntime = "androidx.room:room-runtime:${Versions.room_version}"
    const val roomCompile = "androidx.room:room-compiler:${Versions.room_version}"
    const val roomPaging = "androidx.room:room-paging:${Versions.room_version}"
    const val hilt = "com.google.dagger:hilt-android:${Versions.hilt}"
    const val hilt_compiler = "com.google.dagger:hilt-android-compiler:${Versions.hilt}"
    //协程
    const val coroutines = "org.jetbrains.kotlinx:kotlinx-coroutines-android:${Versions.coroutines}"
    //retrofit
    const val retrofit2 = "com.squareup.retrofit2:retrofit:${Versions.retrofit2}"
    //rx
    const val rxjava = "io.reactivex.rxjava2:rxjava:${Versions.rxjava}"
    const val rxpermissions = "com.github.tbruyelle:rxpermissions:${Versions.rxpermissions}"
    //gson解析器
    const val converterGson = "com.squareup.retrofit2:converter-gson:${Versions.retrofit2}"
    //glide
    const val glide =  "com.github.bumptech.glide:glide:${Versions.glide}"
    //mmkv
    const val mmkv =  "com.tencent:mmkv:${Versions.mmkv}"
    //okhttp
    const val okhttp = "com.squareup.okhttp3:okhttp:${Versions.okhttp}"
    const val okhttp_logging = "ccom.squareup.okhttp3:logging-interceptor:${Versions.okhttp_logging}"
    //eventbus
    const val eventbus = "org.greenrobot:eventbus:${Versions.eventbus}"
    //ARouter
    const val arouter = "com.alibaba:arouter-api:${Versions.arouter}"
    const val arouter_compiler = "com.alibaba:arouter-compiler:${Versions.arouter}"
    //刷新
    const val loadsir = "com.kingja.loadsir:loadsir:${Versions.loadsir}"
    const val immersionbar = "com.gyf.immersionbar:immersionbar:${Versions.immersionbar}"
}
3.gradle.properties
isModule = false
4.settings.gradle
pluginManagement {
    repositories {
        gradlePluginPortal()
        google()
        mavenCentral()

    }
}
dependencyResolutionManagement {
    repositoriesMode.set(RepositoriesMode.FAIL_ON_PROJECT_REPOS)
    repositories {
        google()
        mavenCentral()
        maven {
            url 'https://maven.aliyun.com/repository/google'
        }
        maven {
            url 'https://maven.aliyun.com/repository/gradle-plugin'
        }
        maven {
            url 'https://maven.aliyun.com/repository/jcenter'
        }
        maven {
            url 'https://maven.aliyun.com/repository/public'
        }
        maven {
            url 'https://maven.aliyun.com/repository/central'
        }
        maven {
            url 'https://plugins.gradle.org/m2/com/gradle'
        }
        maven { url 'https://jitpack.io' }
    }
}

rootProject.name = "openEye"
include ':app'
include ':library-base'
include ':library-common'
include ':library-network'
include ':library-video'
include ':library-widget'
include ':module-main'
include ':module-home'
include ':module-community'
include ':module-more'
include ':module-player'
include ':module-user'
5.app主壳
plugins {
    id 'com.android.application'
    id 'org.jetbrains.kotlin.android'
    id 'com.google.dagger.hilt.android' //hilt插件
    id 'kotlin-kapt'//kotlin注解
}
def keystorePropertiesFile = rootProject.file("keystore.properties")
def keystoreProperties = new Properties()
keystoreProperties.load(new FileInputStream(keystorePropertiesFile))

android {
    compileSdk Versions.compileSdk

    defaultConfig {

        applicationId Versions.applicationId
        minSdk Versions.minSdk
        targetSdk Versions.targetSdk
        versionCode Versions.versionCode
        versionName Versions.versionName
        javaCompileOptions {
            annotationProcessorOptions {
                arguments = [AROUTER_MODULE_NAME: project.getName()]
            }
        }
        testInstrumentationRunner "androidx.test.runner.AndroidJUnitRunner"
    }
    signingConfigs {
        release {
            keyAlias keystoreProperties['keyAlias']
            keyPassword keystoreProperties['keyPassword']
            storeFile file(keystoreProperties['storeFile'])
            storePassword keystoreProperties['storePassword']
        }
    }
    buildTypes {
        release {
            minifyEnabled true //开启混淆
            shrinkResources true //移除未使用资源
            proguardFiles getDefaultProguardFile('proguard-android-optimize.txt'), 'proguard-rules.pro'
            signingConfig signingConfigs.release
        }
    }
    compileOptions {
        sourceCompatibility JavaVersion.VERSION_1_8
        targetCompatibility JavaVersion.VERSION_1_8
    }
    kotlinOptions {
        jvmTarget = '1.8'
    }
    sourceSets {
        main{
            if (isModule.toBoolean()){
                //单独运行
                manifest.srcFile 'src/main/alone/AndroidManifest.xml'
            }
            else {
                //合并到宿主中
                manifest.srcFile 'src/main/AndroidManifest.xml'
                resources{
                    //正式版本时.剔除debug文件夹下的所有调式文件
                    exclude 'src/debug/*'
                }
            }
        }
    }
    //统一资源前缀,规范资源引用
    resourcePrefix "app_"
    //开启dataBinding
    dataBinding{
        enabled true
    }


}

dependencies {

    implementation Libs.coreKtx
    implementation Libs.appcompat
    implementation Libs.material
    implementation Libs.constraintlayout
    testImplementation Libs.junit
    androidTestImplementation Libs.junitTest
    androidTestImplementation Libs.espresso_core

    //宿主项目中判断组件是否需要独立运行
    if (isModule.toBoolean()) {
        //组件独立运行时,宿主项目直接依赖基础库,避免编译错误
        implementation project(':library-base')
    } else {
        //主业务模块
        implementation project(':module-main')
        //首页模块
        implementation project(':module-home')
        //社区模块
        implementation project(':module-community')
        //更多模块
        implementation project(':module-more')
        //视频播放模块
        implementation project(':module-player')
        //用户模块
        implementation project(':module-user')
    }
}