文章目录
- 1. 前言
- 2. 简单使用
- 3. 其余用法
- 3.1 依赖&版本管理
- 3.2 插件版本自增
- 3.3 其余
- 4. 链接
1. 前言
在【Android gradle】自定义一个android gradle插件,并发布到私有Artifactory仓库这篇文章中介绍了定义一个gradle插件,然后发布到远程或者本地仓库,最后在项目中使用的流程。但实际上还是过于复杂化了。对于自己的项目工程来说,我们希望简化这个流程,而buildSrc这个目录就运应而生了。
2. 简单使用
在项目目录下执行下面的操作:
# 1. 创建buildSrc目录,当然也可以用下面的命令来创建多个
mkdir buildSrc
首先,根据你自己期望的java或者groovy语言来创建目录:
# 2. 插件源代码目录
mkdir buildSrc\src\main\java
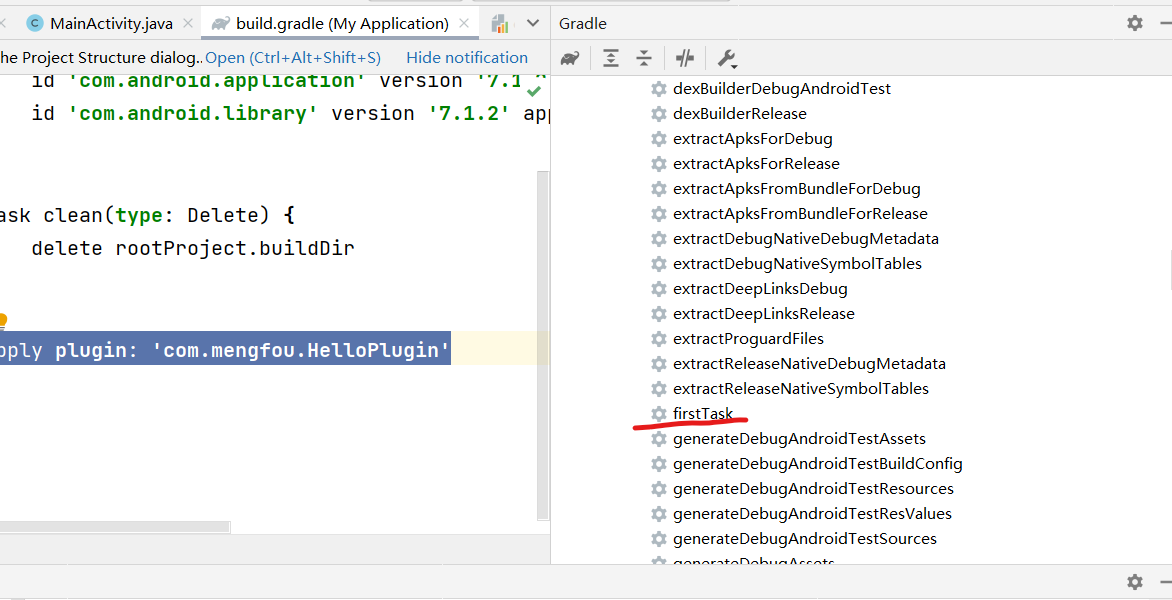
然后同步一下项目,可以看见这个目录就被识别了:

然后在其下创建对应的Plugin实现类以及对应的Task,比如:
public class HelloPlugin implements Plugin<Project> {

    @Override
    public void apply(Project project) {
        project.getTasks().create("firstTask", FirstTask.class);
    }
}

public class FirstTask extends DefaultTask {

    @TaskAction
    void doSomething() {
        getProject().getLogger().warn("=========> firstTask:doSomething...");
    }
}
然后,类似的我们需要在resources目录下创建META-INF/gradle-plugins两级目录,然后创建对应的自己定义的插件名.properties文件(完整路径:buildSrc/src/main/resources/META-INF/gradle-plugins/sample.properties),其中做关联:
implementation-class=com.mengfou.HelloPlugin
最后就是在我们的项目的build.gradle中进行apply:
apply plugin: 'com.mengfou.HelloPlugin'
再次同步后,就可以看到我们定义的firstTask:
最后可以通过执行这个task来看看是否定义成功:
gradlew firstTask
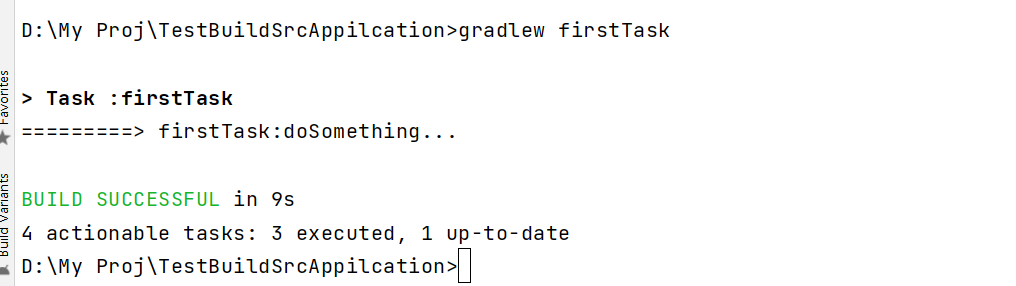
可以看见就执行了。而且这个过程中我们并没有添加:
import org.gradle.api.Plugin;
import org.gradle.api.Project;
等相关的依赖,这里却可以很方便的使用,较上一篇文中的定义插件的方式确实方便了很多。
3. 其余用法
3.1 依赖&版本管理
比如我们可以使用buildSrc来管理依赖,比如我们可以定义一个Deps.java的文件来进行依赖的版本管理,在这个新建的demo工程的app模块的build.gradle文件中有这些依赖:
dependencies {

    implementation 'androidx.appcompat:appcompat:1.3.0'
    implementation 'com.google.android.material:material:1.4.0'
    implementation 'androidx.constraintlayout:constraintlayout:2.0.4'
    testImplementation 'junit:junit:4.13.2'
    androidTestImplementation 'androidx.test.ext:junit:1.1.3'
    androidTestImplementation 'androidx.test.espresso:espresso-core:3.4.0'
}
我们可以将其进行改造,即:
public class Deps {
    public static final String appCompat = "androidx.appcompat:appcompat:1.3.0";
    public static final String material = "com.google.android.material:material:1.4.0";
    public static final String constraintLayout = "androidx.constraintlayout:constraintlayout:2.0.4";
    public static final String junit = "junit:junit:4.13.2";
    public static final String ext_junit = "androidx.test.ext:junit:1.1.3";
    public static final String espresso = "androidx.test.espresso:espresso-core:3.4.0";
}
然后同步一下,最终我们在build.gradle中可直接导包后使用:
import com.mengfou.deps.Deps
dependencies {
    implementation Deps.appCompat
    implementation Deps.material
    implementation Deps.constraintLayout
    testImplementation Deps.junit
    androidTestImplementation Deps.ext_junit
    androidTestImplementation Deps.espresso
}
3.2 插件版本自增
为了更方便的管理(自增)发布插件/aar/apk的版本,我们可以写一个插件做一个简单的版本管理。可以简单定义一个修改文件名的Task:
public class ApkVersionTask extends DefaultTask {
    private Project mProject;
    private String mVariant;

    @TaskAction
    public void modifyFileName() {
        AppExtension appExtension = mProject.getExtensions().getByType(AppExtension.class);
        for (ApplicationVariant applicationVariant : appExtension.getApplicationVariants()) {
            if(mVariant.equals(applicationVariant.getName())) {
                try {
                    String stringBuilder = mProject.getBuildDir().getAbsolutePath() +
                            File.separator +
                            "outputs" +
                            File.separator +
                            "apk" +
                            File.separator +
                            applicationVariant.getBuildType().getName();
                    File parent = new File(stringBuilder);
                    for (File file : Objects.requireNonNull(parent.listFiles())) {
                        if (file.getName().endsWith(".apk")) {
                            File outputNewFile = new File(parent, "mengfou-" + getConfigVersion() + "-" + mVariant.toLowerCase() + ".apk");
                            file.renameTo(outputNewFile);
                        }
                    }
                } catch (Exception e) {
                    e.printStackTrace();
                }
            }
        }
    }

    private String getConfigVersion() {
        try {
            File file = new File(mProject.getBuildFile().getParent(), "versions.properties");
            FileInputStream fileInputStream = new FileInputStream(file);
            byte[] buffer = new byte[1024];
            int len = -1;
            StringBuilder stringBuffer = new StringBuilder();
            while((len = fileInputStream.read(buffer)) != -1) {
                stringBuffer.append(new String(buffer, 0, len));
            }
            if(stringBuffer.toString().trim().length() != 0) {
                String[] split = stringBuffer.toString().split("=");
                if(split.length == 2 && split[0].equals("apk-version")) {
                    return split[1];
                }
            }
        } catch (IOException e) {
            e.printStackTrace();
        }
        return "empty";
    }

    public void setProject(Project project) {
        mProject = project;
    }

    public void setVariant(String variant) {
        mVariant = variant;
    }
}
而getConfigVersion为从app/versions.properties文件中读取一个apk-version的配置,即:
apk-version=1.2.0
然后我们需要做的就是将ApkVersionTask插入到插件的合适的位置中去,通过命令:
>gradlew assemDeb --console=plain --stacktrace
可以看见最终执行的task:
> Task :app:packageDebug
> Task :app:createDebugApkListingFileRedirect
> Task :app:assembleDebug
所以我们只需要将自定义的Task放置在packageDebug之后,assembleDebug之前即可。
public class HelloPlugin implements Plugin<Project> {

    @Override
    public void apply(Project project) {
        AppExtension appExtension = project.getExtensions().getByType(AppExtension.class);
        project.afterEvaluate(new Action<Project>() {
            @Override
            public void execute(Project project) {
                for (ApplicationVariant applicationVariant : appExtension.getApplicationVariants()) {
                    System.out.println("applicationVariant is: " + applicationVariant.toString());
                    try {
                        ApkVersionTask apkVersionTask = project.getTasks().create(getTaskName("reName", "Apk", applicationVariant.getName()), ApkVersionTask.class);
                        apkVersionTask.setProject(project);
                        apkVersionTask.setVariant(applicationVariant.getName());

                        Class<? extends ApplicationVariantImpl> aClass = ((ApplicationVariantImpl) applicationVariant).getClass();
                        Method variantData = aClass.getDeclaredMethod("getVariantData");
                        variantData.setAccessible(true);
                        BaseVariantData baseVariantData = (BaseVariantData) variantData.invoke(applicationVariant);

                        Task packageTask = project.getTasks().findByName(baseVariantData.getTaskContainer().getPackageAndroidTask().getName());
                        Task createApkListingFileRedirectTask = project.getTasks().findByName(getTaskName("create", "ApkListingFileRedirect", applicationVariant.getName()));
                        apkVersionTask.dependsOn(packageTask);
                        apkVersionTask.dependsOn(createApkListingFileRedirectTask);
                        Task assembleTask = project.getTasks().findByName(getTaskName("assemble", "", applicationVariant.getName()));
                        assembleTask.dependsOn(apkVersionTask);
                    } catch (Exception e) {
                        e.printStackTrace();
                    }
                }
            }
        });
    }

    public String getTaskName(String prefix, String suffix, String variantName) {
        String name = variantName.substring(0, 1).toUpperCase() + variantName.substring(1);
        return prefix + name + suffix;
    }

}
运行后:
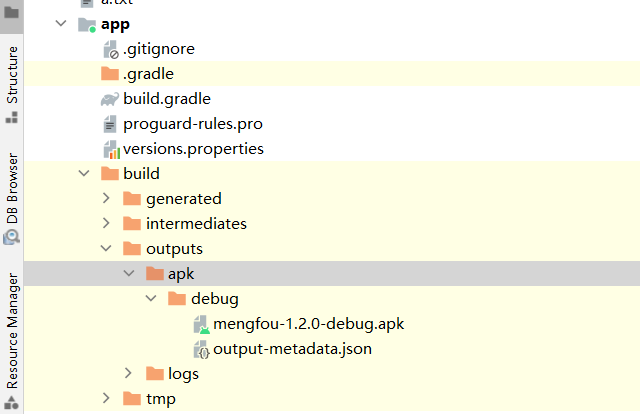
可以看见达到了预期。
3.3 其余
待填坑…
4. 链接
代码地址:https://gitee.com/weizu_cool/gradle-plugin-demo.git

![[数据结构复习]自用大纲](https://img-blog.csdnimg.cn/c312aa0711b64f7c83fecdace5a2c978.png#pic_center)