文章目录
- 三、Gradle使用
- 1 在 idea 中创建普通 java 工程
- 2 在 idea 中创建 ssm 工程
- 3 项目部署
- 3.1 本地tomcat部署项目
- 3.2 Gretty 部署项目
- 3.3 具体使用
- 4 Gradle 对测试支持
- 4.1 默认测试目录及标准输出
- 4.2 Junit 使用
- 4.3 包含和排除特定测试
【尚硅谷】Gradle教程-讲师:刘辉
生活明朗,万物可爱,人间值得,未来可期
三、Gradle使用
java__9">1 在 idea 中创建普通 java 工程
具体整合:
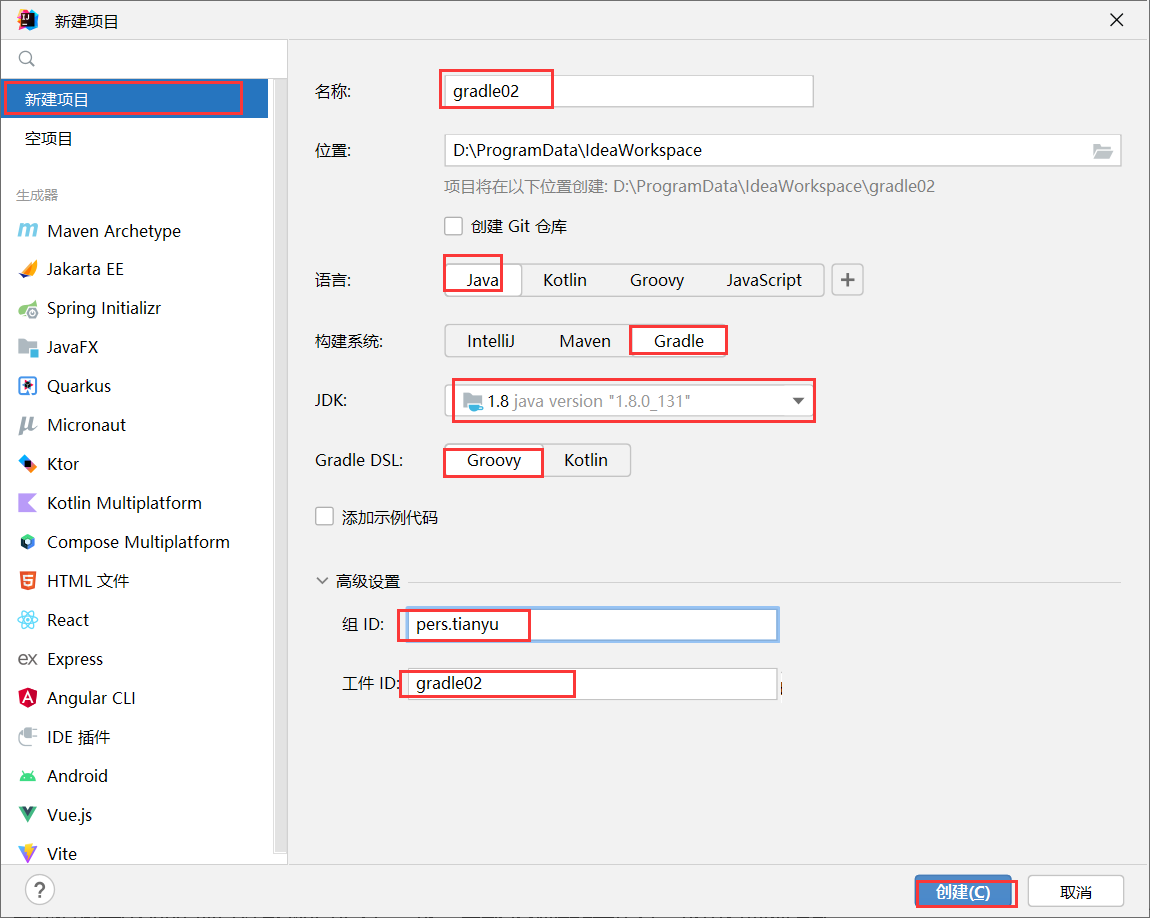
第一步:创建由 Gradle 管理的项目

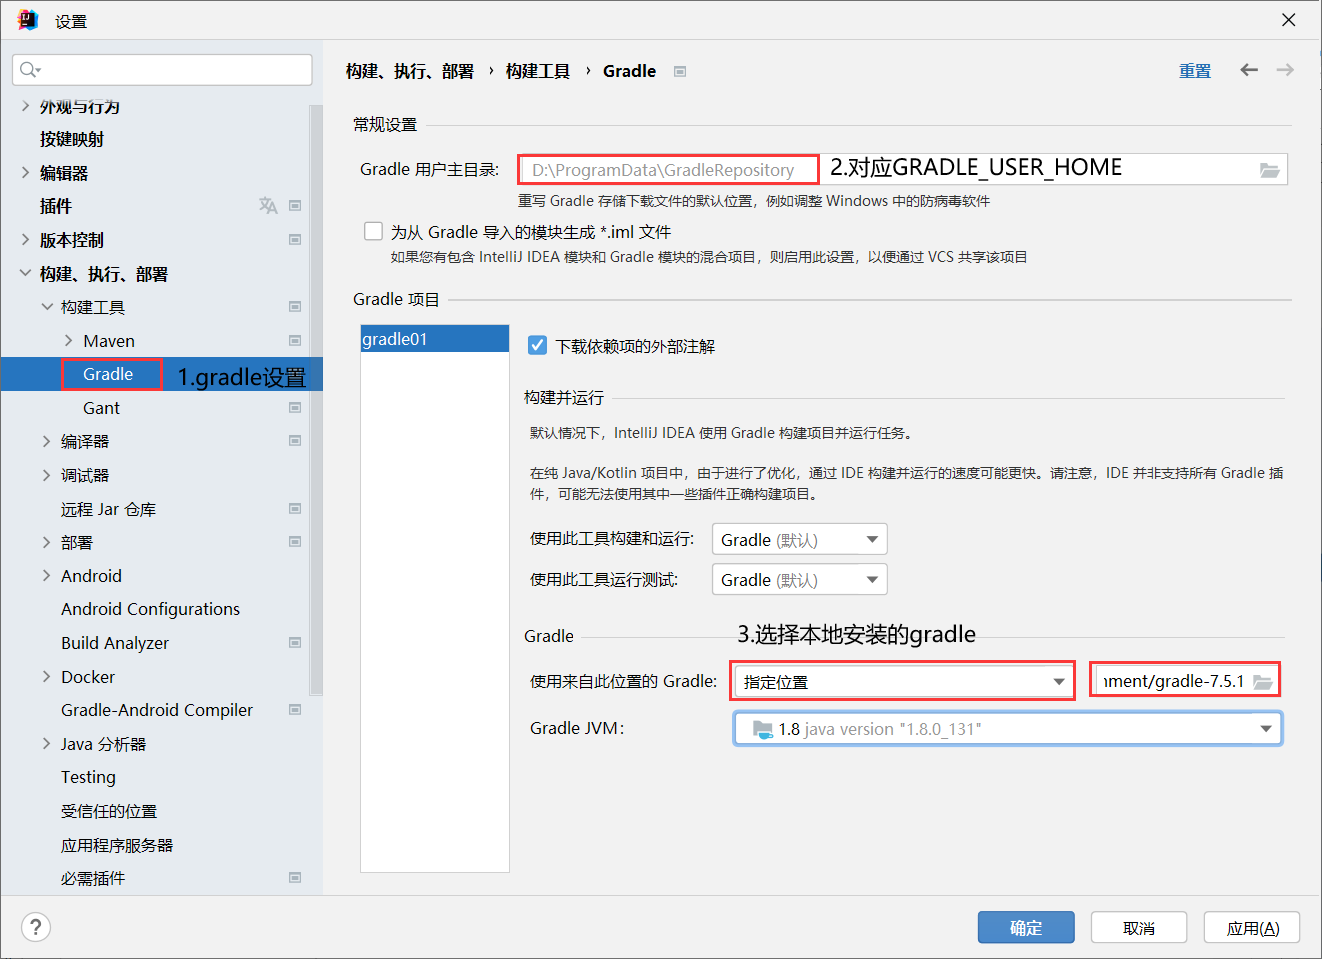
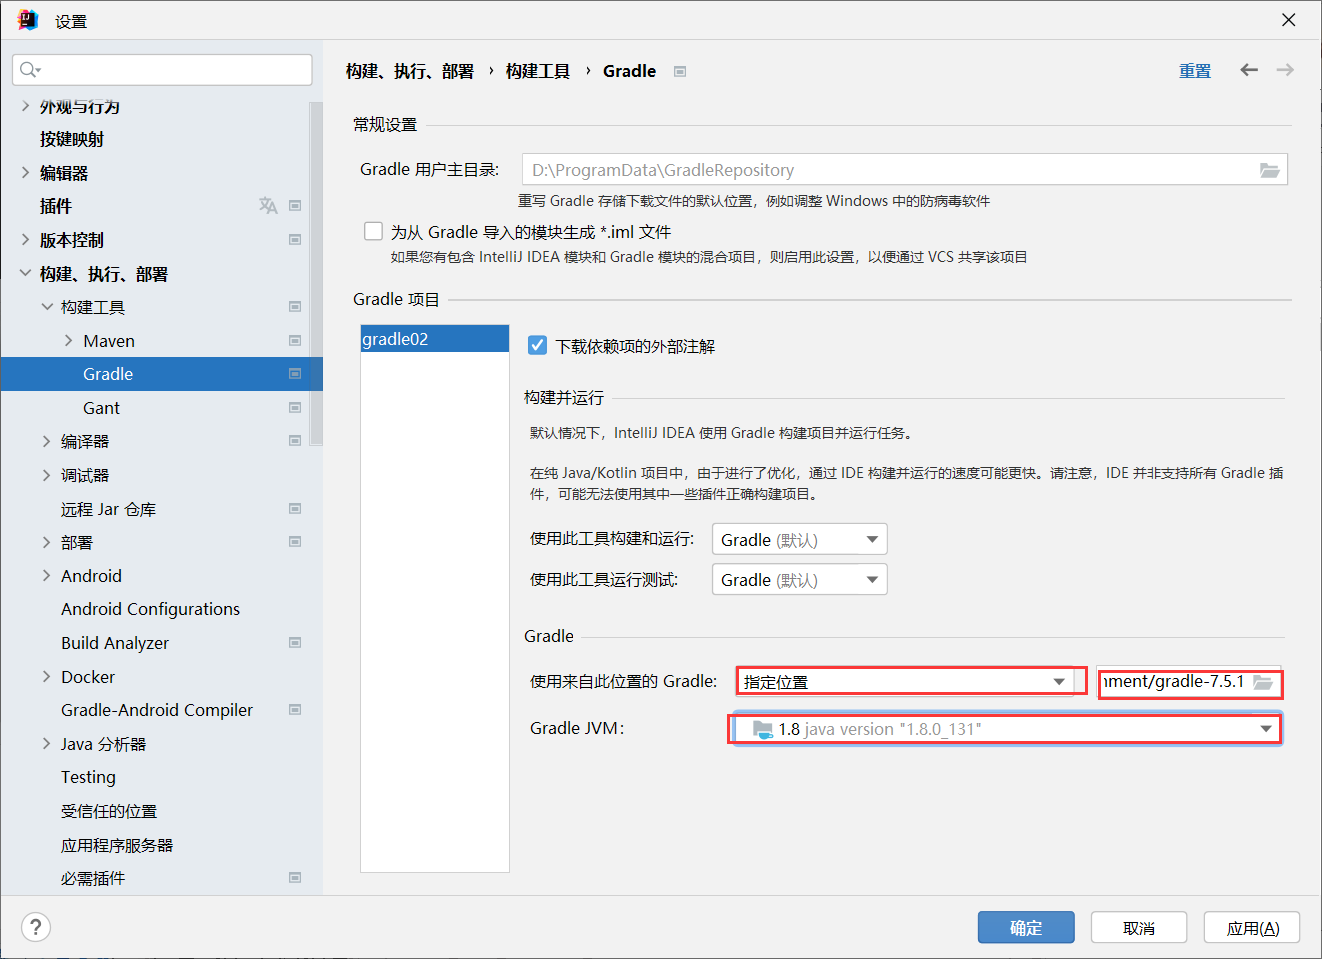
第二步:修改当前项目使用本地安装的 gradle:可以加快下载项目依赖 jar 包的速度【配置了私服地址】。
特别提示 1:
使用在 Terminal(终端) 中执行以 gradlew 开头命令和操作图形化的 IDEA 使用 Gradle 版本不一定是同一个版。
特别提示 2:
目前只能是在创建项目时重新设置本地 gradle,创建新项目需要重新去改。
特 别 提 示 3:
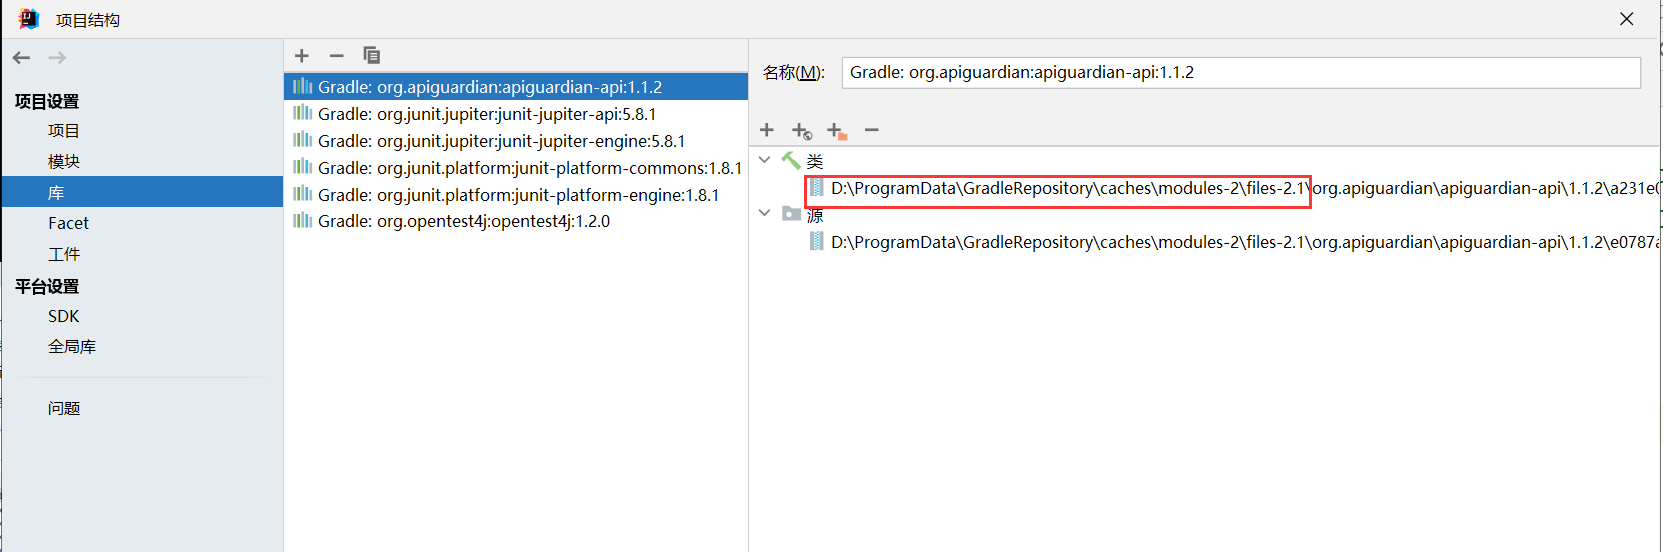
当我们在 gradle.build 文件添加依赖之后 ,这些依赖会在下载到GRADLE_USER_HOME/caches/modules-2/files-2.1 目录下面,所以这里的 GRADLE_USER_HOME 相当于 Gradle 的本地仓库,当然也可以如下方式找到 jar 包位置。
2 在 idea 中创建 ssm 工程
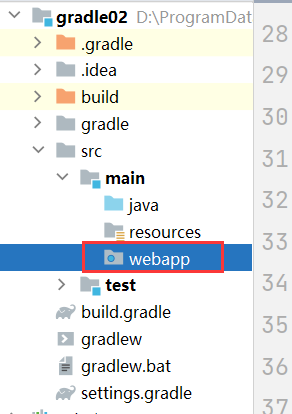
在 idea 新版本的创建项目中,只能创建项目是普通 java 工程,无法创建 web 工程了【IDEA 旧版本是可以的】,所以我们如果想创建 web 工程,只需要自己在 src/main/目录下添加 webapp/WEB-INF/web.xml 及页面即可。
演示:
创建后指定用户安装的Gradle
在build.gradle中添加war插件
plugins {
    id 'java'
    id 'war'
}
导入依赖信息
dependencies {

    implementation 'org.springframework:spring-beans:4.1.7.RELEASE'
    implementation 'org.springframework:spring-web:4.1.7.RELEASE'
    implementation 'org.springframework:spring-webmvc:4.1.7.RELEASE'
    implementation 'org.springframework:spring-tx:4.1.7.RELEASE'
    implementation 'org.springframework:spring-test:4.0.5.RELEASE'
    implementation 'org.springframework:spring-jdbc:4.1.7.RELEASE'

    implementation 'org.mybatis:mybatis-spring:1.2.3'
    implementation 'org.mybatis:mybatis:3.3.0'

    implementation 'mysql:mysql-connector-java:8.0.29'
    implementation 'com.alibaba:druid:1.0.15'

    implementation "com.fasterxml.jackson.core:jackson-databind:2.2.3"
    implementation "com.fasterxml.jackson.core:jackson-annotations:2.2.3"
    implementation "com.fasterxml.jackson.core:jackson-core:2.2.3"

    implementation 'org.aspectj:aspectjweaver:1.8.6'
    implementation 'log4j:log4j:1.2.17'
    implementation 'org.slf4j:slf4j-api:1.7.25'
    implementation 'jstl:jstl:1.2'
    compileOnly 'javax.servlet:servlet-api:2.5'
    testImplementation group: 'junit' ,name: 'junit', version: '4.12'
}
在src/main目录底下添加webapp文件夹,webapp文件夹有一个点说明生效。
在webapp文件夹内创建WEB-INF文件夹,添加web.xml文件。
<?xml version="1.0" encoding="UTF-8"?>
<web-app version="2.4"
         xmlns="http://java.sun.com/xml/ns/j2ee"
         xmlns:xsi="http://www.w3.org/2001/XMLSchema-instance"
         xsi:schemaLocation="http://java.sun.com/xml/ns/j2ee
        http://java.sun.com/xml/ns/j2ee/web-app_2_4.xsd">
    <!-- 1.Spring整合SpringMVC -->
    <context-param>
        <!-- 指定spring 配置文件的路径和名称 -->
        <param-name>contextConfigLocation</param-name>
        <param-value>classpath:applicationContext.xml</param-value>
    </context-param>
    <!-- 指定spring的监听器 -->
    <listener>
        <listener-class>org.springframework.web.context.ContextLoaderListener</listener-class>
    </listener>

    <!-- 2.配置springmvc的前端控制器 -->
    <servlet>
        <servlet-name>dispatcherServlet</servlet-name>
        <servlet-class>org.springframework.web.servlet.DispatcherServlet
        </servlet-class>
        <!-- 配置初始化参数,加载springmvc.xml配置文件 -->
        <init-param>
            <param-name>contextConfigLocation</param-name>
            <!-- 写自己springmvc配置文件的名字 -->
            <param-value>classpath:springmvc.xml</param-value>
        </init-param>
        <!-- 优先级 -->
        <load-on-startup>1</load-on-startup>
    </servlet>
    <servlet-mapping>
        <servlet-name>dispatcherServlet</servlet-name>
        <url-pattern>/</url-pattern>
    </servlet-mapping>

    <!-- 3.处理POST请求乱码的过滤器 -->
    <filter>
        <filter-name>CharacterEncodingFilter</filter-name>
        <filter-class>org.springframework.web.filter.CharacterEncodingFilter</filter-class>
        <!-- 初始化参数1:设置自定义编码,处理请求 -->
        <init-param>
            <param-name>encoding</param-name>
            <param-value>UTF-8</param-value>
        </init-param>
        <!-- 初始化参数2:处理响应编码 -->
        <init-param>
            <param-name>forceEncoding</param-name>
            <param-value>true</param-value>
        </init-param>
    </filter>
    <filter-mapping>
        <filter-name>CharacterEncodingFilter</filter-name>
        <url-pattern>/*</url-pattern>
    </filter-mapping>


    <!-- 4.配置将POST请求转换为PUT或者DELETE请求的过滤器 -->
    <filter>
        <filter-name>HiddenHttpMethodFilter</filter-name>
        <filter-class>org.springframework.web.filter.HiddenHttpMethodFilter</filter-class>
    </filter>
    <filter-mapping>
        <filter-name>HiddenHttpMethodFilter</filter-name>
        <url-pattern>/*</url-pattern>
    </filter-mapping>
</web-app>
准备spring和springMVC配置文件
applicationContext.xml
<?xml version="1.0" encoding="UTF-8"?>
<beans xmlns="http://www.springframework.org/schema/beans"
       xmlns:xsi="http://www.w3.org/2001/XMLSchema-instance"
       xmlns:context="http://www.springframework.org/schema/context"
       xmlns:tx="http://www.springframework.org/schema/tx"
       xsi:schemaLocation="http://www.springframework.org/schema/beans
                           http://www.springframework.org/schema/beans/spring-beans.xsd
                           http://www.springframework.org/schema/context
                           https://www.springframework.org/schema/context/spring-context.xsd
                           http://www.springframework.org/schema/tx
                           http://www.springframework.org/schema/tx/spring-tx.xsd">


    <!-- 1.扫描指定包下注释 -->
    <context:component-scan base-package="pers.tianyu">
        <!-- 不扫描controller、ControllerAdvice注解 -->
        <context:exclude-filter type="annotation" expression="org.springframework.stereotype.Controller"/>
        <context:exclude-filter type="annotation"
                                expression="org.springframework.web.bind.annotation.ControllerAdvice"/>
    </context:component-scan>

    <!-- 2.加载properties文件 -->
    <context:property-placeholder location="classpath:jdbc.properties"></context:property-placeholder>


    <!-- 3.配置Druid数据源 -->
    <bean id="dataSource" class="com.alibaba.druid.pool.DruidDataSource">
        <property name="username" value="${jdbc.userName}"></property>
        <property name="password" value="${jdbc.password}"></property>
        <property name="url" value="${jdbc.jdbcUrl}"></property>
        <property name="driverClassName" value="${jdbc.driverClass}"></property>
    </bean>

    <!-- 4.配置数据源事务管理器 -->
    <bean id="transactionManager" class="org.springframework.jdbc.datasource.DataSourceTransactionManager">
        <property name="dataSource" ref="dataSource"></property>
    </bean>

    <tx:annotation-driven transaction-manager="transactionManager"></tx:annotation-driven>


    <!-- 5.配置spring整合mybatis -->
    <bean class="org.mybatis.spring.SqlSessionFactoryBean">
        <property name="dataSource" ref="dataSource"></property>
        <property name="configLocation" value="classpath:mybatis-config.xml"></property>
    </bean>

    <!-- 6.配置扫描mapper接口的bean对象 -->
    <bean class="org.mybatis.spring.mapper.MapperScannerConfigurer">
        <property name="basePackage" value="pers.tianyu.dao"/>
    </bean>

</beans>
springmvc.xml
<?xml version="1.0" encoding="UTF-8"?>
<beans xmlns="http://www.springframework.org/schema/beans"
       xmlns:xsi="http://www.w3.org/2001/XMLSchema-instance"
       xmlns:context="http://www.springframework.org/schema/context"
       xmlns:mvc="http://www.springframework.org/schema/mvc"
       xsi:schemaLocation="http://www.springframework.org/schema/beans http://www.springframework.org/schema/beans/spring-beans.xsd http://www.springframework.org/schema/context https://www.springframework.org/schema/context/spring-context.xsd http://www.springframework.org/schema/mvc https://www.springframework.org/schema/mvc/spring-mvc.xsd">

    <!-- 1.配置扫描包 -->
    <context:component-scan base-package="pers.tianyu" use-default-filters="false">
        <context:include-filter type="annotation" expression="org.springframework.stereotype.Controller"/>
        <context:include-filter type="annotation"
                                expression="org.springframework.web.bind.annotation.ControllerAdvice"/>
    </context:component-scan>

    <!-- 2.配置内部资源视图解析器-->
    <bean class="org.springframework.web.servlet.view.InternalResourceViewResolver">
        <property name="prefix" value="/WEB-INF/"/>
        <property name="suffix" value=".jsp"/>
    </bean>
    <!--3.处理静态资源文件 -->
    <mvc:default-servlet-handler/>
    <mvc:annotation-driven/>
</beans>
mybatis-config.xml
<?xml version="1.0" encoding="UTF-8" ?>
<!DOCTYPE configuration
        PUBLIC "-//mybatis.org//DTD Config 3.0//EN"
        "http://mybatis.org/dtd/mybatis-3-config.dtd">
<configuration>


</configuration>
jdbc.properties
jdbc.jdbcUrl=jdbc:mysql://localhost:3306/test?userUnicode=true&characterEncoding=utf8&useSSL=true&serverTime=GMT%2B8
jdbc.driverClass=com.mysql.cj.jdbc.Driver
jdbc.userName=root
jdbc.password=root
mysql
SET NAMES utf8mb4;
SET FOREIGN_KEY_CHECKS = 0;

-- ----------------------------
-- Table structure for admin
-- ----------------------------
DROP TABLE IF EXISTS `admin`;
CREATE TABLE `admin`  (
  `id` int NOT NULL,
  `username` varchar(50) CHARACTER SET utf8mb4 COLLATE utf8mb4_0900_ai_ci NULL DEFAULT NULL,
  `email` varchar(60) CHARACTER SET utf8mb4 COLLATE utf8mb4_0900_ai_ci NULL DEFAULT NULL,
  PRIMARY KEY (`id`) USING BTREE
) ENGINE = InnoDB CHARACTER SET = utf8mb4 COLLATE = utf8mb4_0900_ai_ci ROW_FORMAT = Dynamic;

-- ----------------------------
-- Records of admin
-- ----------------------------
INSERT INTO `admin` VALUES (1, '张无忌', 'zhangwuji@163.com');
INSERT INTO `admin` VALUES (2, '张三丰', 'zhangsanfeng@163.com');

SET FOREIGN_KEY_CHECKS = 1;
java代码
Admin.java
java">public class Admin {
    private Integer id;
    private String username;
    private String email;
// set
// get
// toString
AdminController.java
java">@Controller
@RequestMapping("/admin")
public class AdminController {

    @Autowired
    private AdminService adminService;

    @RequestMapping("/list")
    @ResponseBody
    public List<Admin> getAdminList() {
        System.out.println("dada");
        return adminService.getAdminList();
    }

}
AdminMapper.java
java">public interface AdminMapper {
    List<Admin> getAdminList();
}
AdminService.java
java">@Service
public class AdminService {

    @Autowired
    private AdminMapper adminMapper;

    @Transactional
    public List<Admin> getAdminList(){
        return adminMapper.getAdminList();
    }
}
创建Mapper接口对应的映射文件,在resources文件夹内按照Mapper接口的包路径创建。(文件前面带小鸟是因为IDEA中的mybatisX的插件,mybatisPlus会用到,这里不做过多说明)
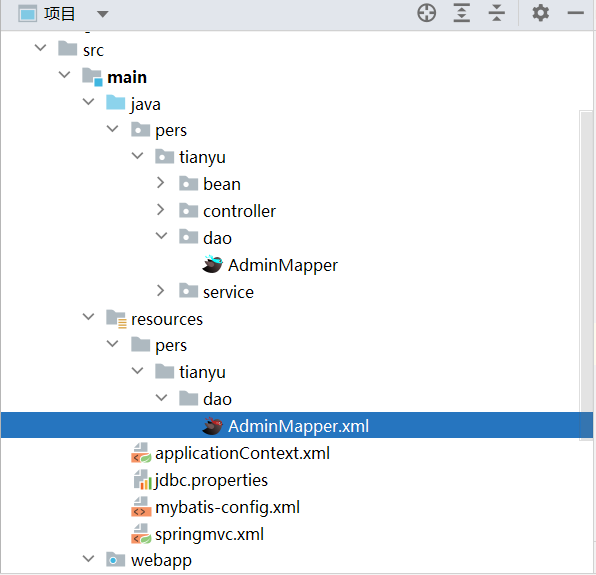
AdminMapper.xml
<?xml version="1.0" encoding="UTF-8" ?>
<!DOCTYPE mapper PUBLIC "-//mybatis.org//DTD Mapper 3.0//EN" "http://mybatis.org/dtd/mybatis-3-mapper.dtd">
<mapper namespace="pers.tianyu.dao.AdminMapper">

    <select id="getAdminList" resultType="pers.tianyu.bean.Admin">
        select id, username, email
        from admin
    </select>


</mapper>
接下来在我们对 gradle 的其它知识点讲解之前我们先提一下在 gradle 文件中需要用到的 Groovy 语法。
3 项目部署
当我们将一个 java 项目打成 war 包之后,就需要部署到服务器运行,这里有两种方式:
- 我们将项目打成 war 包,部署到本地 tomcat 运行
- 使用 Gretty 插件中内置服务器方式部署项目
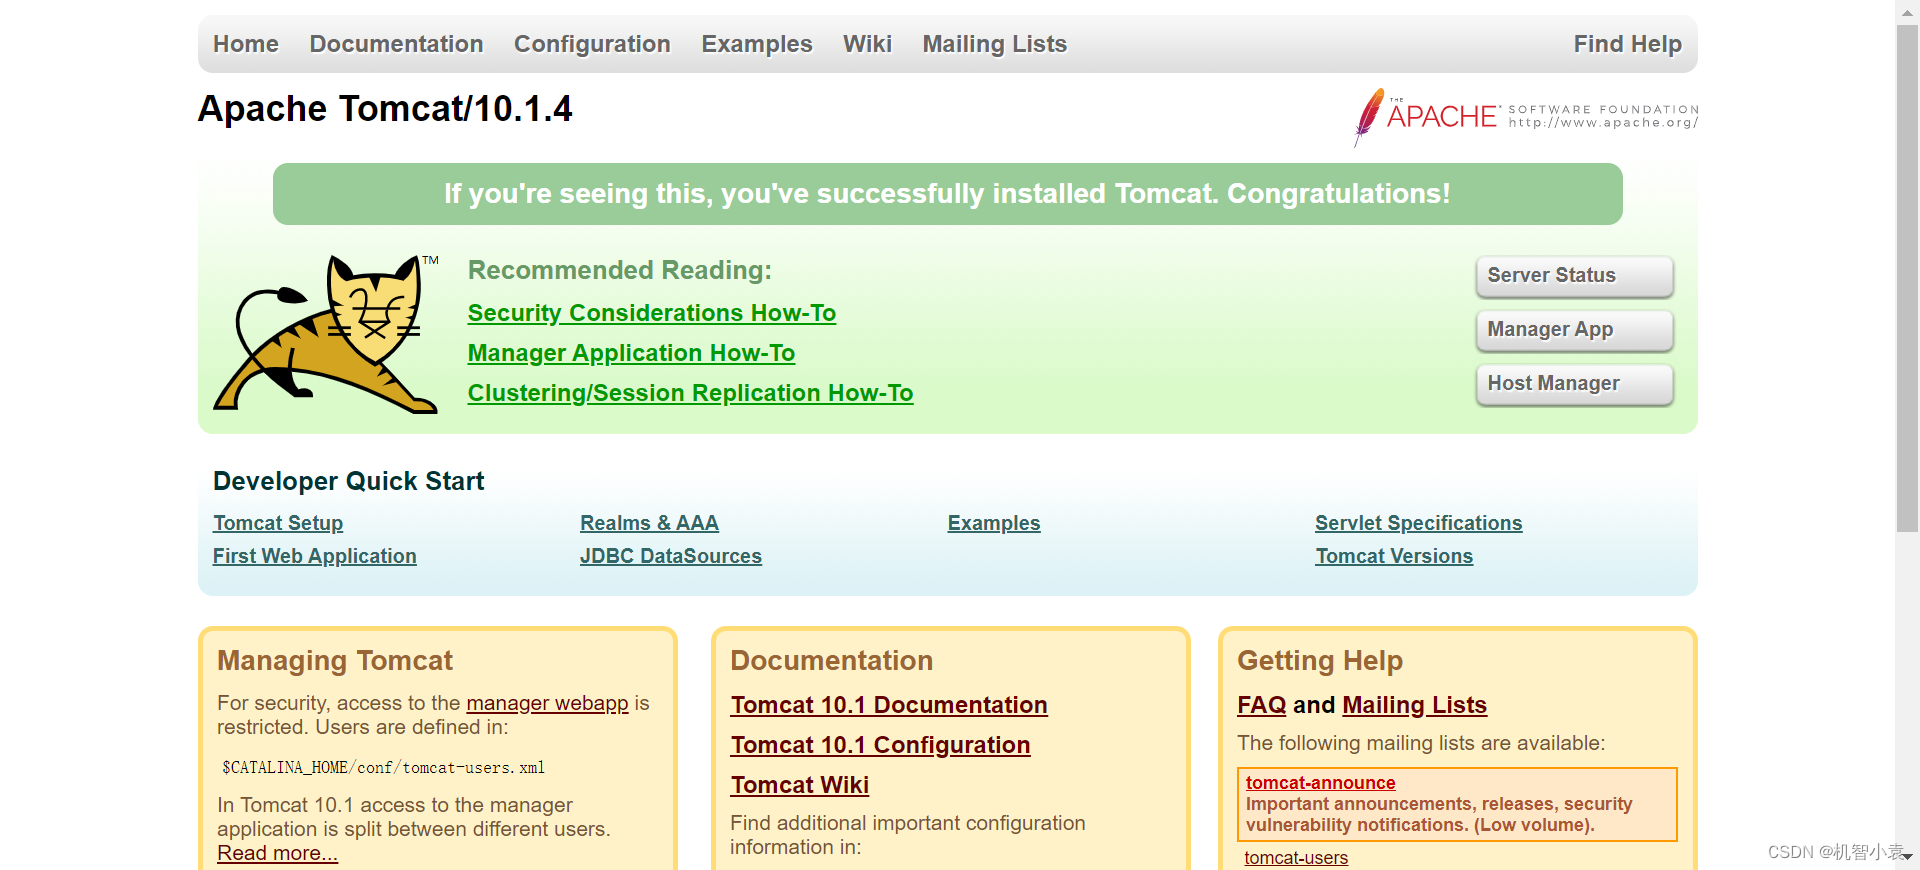
3.1 本地tomcat部署项目
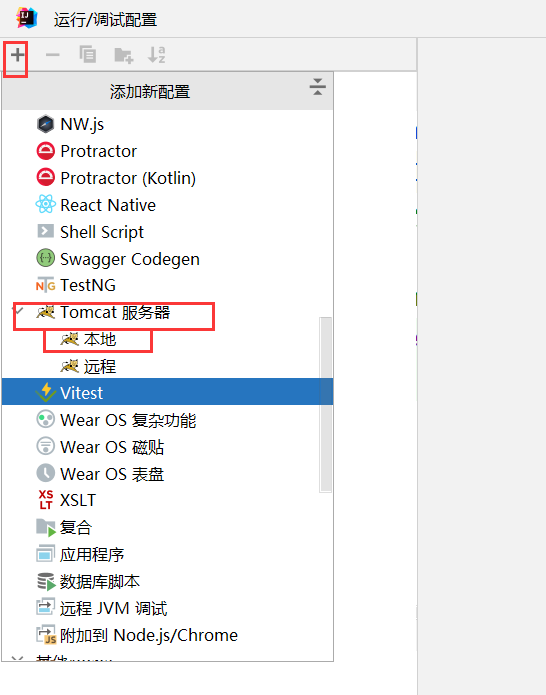

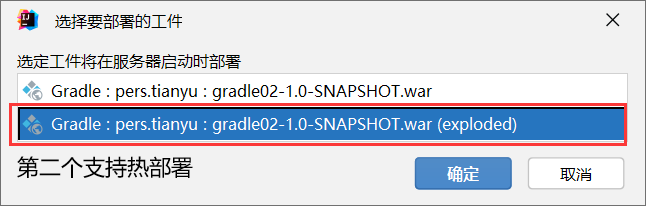

访问 http://localhost:8080/ssm/admin/list

3.2 Gretty 部署项目
Gretty 是一个功能丰富的 gradle 插件,用于在嵌入的 servlet 容器上运行 web 应用程序,让项目开发和部署更加简单。
目前 Gretty 插件已经作为 gradle 的核心库使用了,Gretty 其核心功能
- 底层支持 jetty、tomcat 等 Servlet 容器
- 支持项目热部署、HTTPS、调试
Gretty 官网地址
3.3 具体使用
第一步:引入 Gretty 插件
plugins {
	id ‘war’
	id 'org.gretty' version '2.2.0'
}
第二步:指定 maven 仓库
repositories {
	//指定jcenter仓库,一定要放在前面
	jcenter()
	mavenCentral()
}
第三步:针对 Gretty 插件的设置
gretty {
httpPort = 8888
contextPath = "/web" //项目名
debugPort = 5005 // default
debugSuspend = true // default
httpsEnabled = true managedClassReload=true //修改了类之后重新加载
//servletContainer = 'tomcat8' //如果不指定默认的servlet容器,支持tomcat7/8,默认是使用的是Jetty服务器
httpsPort = 4431
}
第四步:执行 Gretty 插件
gradle appRun
如 果大家想进一步了解的属性配置,比如Gretty热部署等设置,欢迎参考其 官方文档。
4 Gradle 对测试支持
测试任务自动检测并执行测试源集中的所有单元测试。
测试执行完成后会生成一个报告。
支持 JUnit 和 TestNG 测试。
4.1 默认测试目录及标准输出

4.2 Junit 使用
Gradle 对于 Junit4.x
dependencies {
	testImplementation group: 'junit' ,name: 'junit', version: '4.12'
}

test {
	useJUnit()
}
Gradle 对于 Junit5.x 版本支持
dependencies {
	testImplementation 'org.junit.jupiter:junit-jupiter-api:5.8.1'
	testRuntimeOnly 'org.junit.jupiter:junit-jupiter-engine:5.8.1'
}

test {
	useJUnitPlatform()
}
测试代码
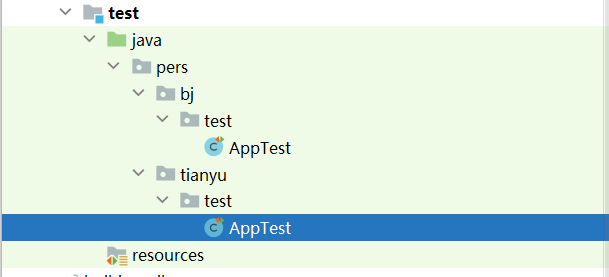
java">public class AppTest {

    @Test
    public void testMethod1(){
        System.out.println("test bj method1");
    }
}
java">public class AppTest {

    @Test
    public void testMethod1() {
        System.out.println("test tianyu method1");
    }
}
注意:
无论是 Junt4.x 版本还是 Junit5.x 版本,我们只需在 build.gradle 目录下执行 gradle test 指令,gradle 就会帮我们执行所有的加了@Test 注解的测试,并生成测试报告。
4.3 包含和排除特定测试
test {
	enabled(true)//false:跳过测试
	useJUnitPlatform()//支持Junit5测试
	include 'pers/**' exclude 'pers/tianyu/**'
}
gradle 在 junit 中的批量测试,可以设置包含或者排除某些特定测试。