移动开发实例-布局练习
当先的项目所在地址C:\Users\cxl\Desktop\food\k2
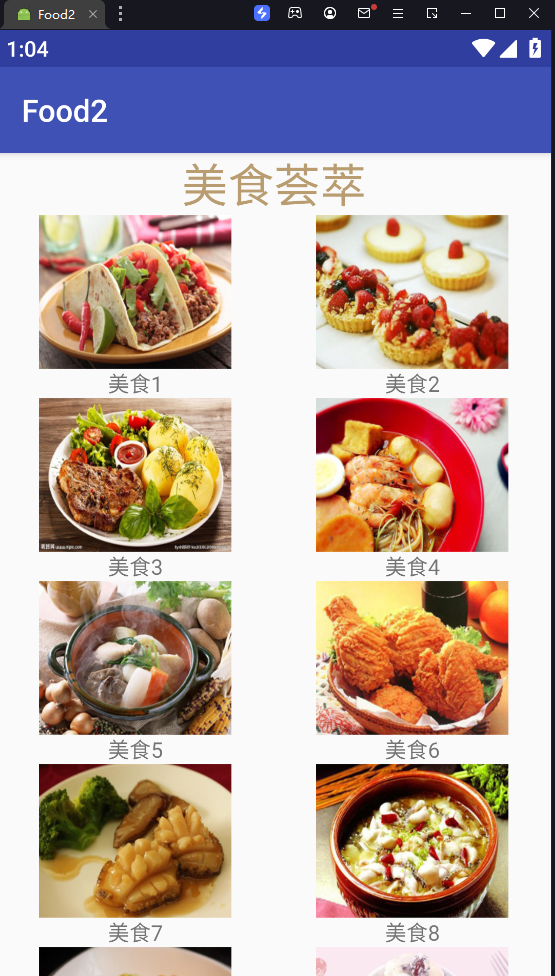
1.GridView栈格布局
1.1效果图
1.2代码
1.目录

图 目录
2.grade配置
// Top-level build file where you can add configuration options common to all sub-projects/modules.

buildscript {
    repositories {
        maven{ url 'http://maven.aliyun.com/nexus/content/groups/public/'}
    }
    dependencies {
        classpath 'com.android.tools.build:gradle:2.2.0'

        // NOTE: Do not place your application dependencies here; they belong
        // in the individual module build.gradle files
    }
}

allprojects {
    repositories {
        maven{ url 'http://maven.aliyun.com/nexus/content/groups/public/'}
    }
}

task clean(type: Delete) {
    delete rootProject.buildDir
}
3.全局的grade配置
dependencies {
    compile fileTree(dir: 'libs', include: ['*.jar'])
    compile 'com.android.support:appcompat-v7:+'
}
4.设置主布局文件
Android GridView详解 - 简书参考
- numColumns设置的是要创建的列的数量
<?xml version="1.0" encoding="utf-8"?>
<LinearLayout xmlns:android="http://schemas.android.com/apk/res/android"
    xmlns:tools="http://schemas.android.com/tools"
    android:id="@+id/activity_food2"
    android:layout_width="match_parent"
    android:layout_height="match_parent"
    android:orientation="vertical"
    tools:context="com.example.cxl.food2.Food2">
<!--显示要显示的标题信息-->
    <TextView
        android:id="@+id/titleText"
        android:layout_width="fill_parent"
        android:layout_height="wrap_content"
        android:text="美食荟萃"
        android:gravity="center"
        android:textSize="30dp"
        android:textColor="#b99d70"
        />

    <!--https://www.jianshu.com/p/cbdf08841ed4-->
    <!--栈格布局-->
    <!--
            android:numColumns="2" 设置的是列数
    -->
    <GridView
        android:id="@+id/gridView1"
        android:layout_width="match_parent"
        android:layout_height="wrap_content"
        android:numColumns="2"
        >
    </GridView>
</LinearLayout>
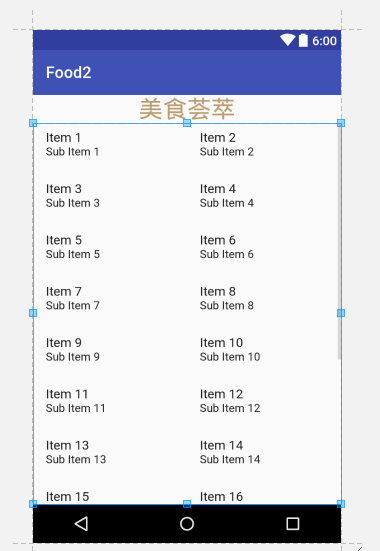
图 设置主布局文件
5.设置
- 列表项的布局文件
<?xml version="1.0" encoding="utf-8"?>
<LinearLayout xmlns:android="http://schemas.android.com/apk/res/android"
    android:orientation="vertical"
    android:layout_width="match_parent"
    android:layout_height="match_parent">
    <!--设置要显示的图片的信息
    图片
    描述信息
    -->
    <ImageView
        android:id="@+id/ms_imd"
        android:layout_width="150dp"
        android:layout_height="100dp"
        android:layout_gravity="center"
        android:src="@drawable/ms1"
        />
    <TextView
        android:id="@+id/ms_desc"
        android:layout_width="wrap_content"
        android:layout_height="wrap_content"
        android:layout_gravity="center"
        android:text="美食"
        />

</LinearLayout>

图 列表项的布局文件
6.java代码
采用的设置的方式SimpleAdapter的方法
- 需要设置数据
- 设置事件监听
public class Food2 extends AppCompatActivity {
private GridView gridView;
//    定义所有的静态文件的信息(所有的美食图片信息)
    private int [] icons={
        R.drawable.ms1,R.drawable.ms2,R.drawable.ms3,
        R.drawable.ms4,R.drawable.ms5,R.drawable.ms6,
        R.drawable.ms7,R.drawable.ms8,R.drawable.ms9,
        R.drawable.ms10,R.drawable.ms11,R.drawable.ms12
    };
//    所有美食的描述信息
    private String[] iconname={
            "美食1","美食2","美食3",
            "美食4","美食5","美食6",
            "美食7","美食8","美食9",
            "美食10","美食11","美食12"};
    @Override
    protected void onCreate(Bundle savedInstanceState) {
        super.onCreate(savedInstanceState);
        setContentView(R.layout.activity_food2);

//        设置要显示的布局的信息
        gridView=findViewById(R.id.gridView1);
//      设置数据SimpleAdapter
        SimpleAdapter adapter=new SimpleAdapter(this,
                getData(),
                R.layout.meishi_item,
                new String[]{"img","desc"},
                new int[]{R.id.ms_imd,R.id.ms_desc});
//        绑定
        gridView.setAdapter(adapter);
//        设置事件监听
        gridView.setOnItemClickListener(new AdapterView.OnItemClickListener() {
            @Override
            public void onItemClick(AdapterView<?> adapterView, View view, int position, long id) {
                String result=adapterView.getItemAtPosition(position).toString();
//                输入要显示的信息
                Toast.makeText(Food2.this,result,Toast.LENGTH_SHORT).show();

            }
        });
    }

    private List<Map<String,Object>> getData(){
        List<Map<String,Object>> list=new ArrayList<>();
        for (int i=0;i<12;i++){
            Map<String,Object> map=new HashMap<>();
            map.put("img",icons[i]);
            map.put("desc",iconname[i]);
            list.add(map);
        }
return  list;
    }
}
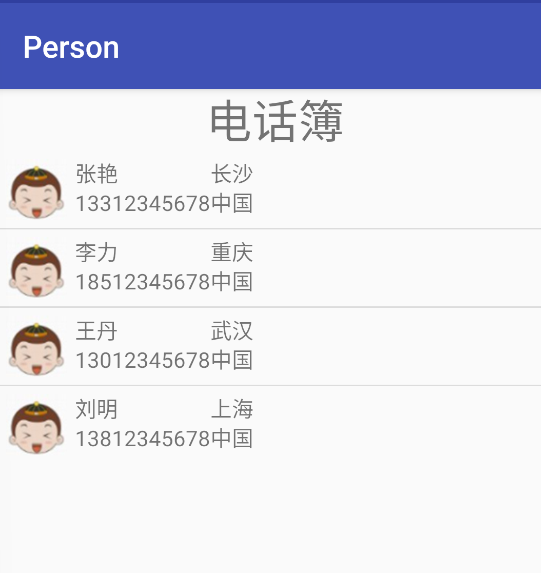
2.ListView布局
出错的地方就是grade详见1.2中的grade配置,设置仓库和依赖的地址就可以
2.1效果图
2.2代码
1.目录

2.全局布局文件设置
- 采用的是ListView的布局方式
<?xml version="1.0" encoding="utf-8"?>
<LinearLayout xmlns:android="http://schemas.android.com/apk/res/android"
    xmlns:tools="http://schemas.android.com/tools"
    android:id="@+id/activity_person"
    android:layout_width="match_parent"
    android:layout_height="match_parent"
    android:orientation="vertical"
    tools:context="com.example.cxl.person.Person">
<!--电话簿-->
    <TextView
        android:layout_width="match_parent"
        android:layout_height="wrap_content"
        android:text="电话簿"
        android:textSize="30dp"
        android:gravity="center"
        />
    <!--显示电话簿列表-->
    <ListView
        android:id="@+id/personListView"
        android:layout_width="match_parent"
        android:layout_height="wrap_content"
        >
    </ListView>

</LinearLayout>
3.子列表的布局
- 线性布局:横向
- textView
- 表格布局
- 第一列
- 第二列
<?xml version="1.0" encoding="utf-8"?>
<LinearLayout xmlns:android="http://schemas.android.com/apk/res/android"
    android:orientation="horizontal"
    android:layout_width="match_parent"
    android:layout_height="match_parent">
    <!--显示左侧的图片-->
    <ImageView
        android:layout_width="50dp"
        android:layout_height="50dp"
        android:src="@drawable/person"
        android:padding="5dp"
        android:id="@+id/img1"
        />
    <!--采用表格的形式显示信息-->
    <TableLayout
        android:layout_width="wrap_content"
        android:layout_height="wrap_content">
        <!--第一行-->
        <TableRow>
            <!--第一列-->
            <TextView
                android:id="@+id/txtName"
                android:layout_width="wrap_content"
                android:layout_height="wrap_content"
                android:text="张艳"
                android:paddingTop="5dp"
                android:paddingRight="10dp"
                />
            <!--第二列-->
            <TextView
                android:id="@+id/txtCity"
                android:layout_width="wrap_content"
                android:layout_height="wrap_content"
                android:text="济南"
                />
        </TableRow>
        <!--第二行-->
        <TableRow>
            <!--第1列-->
            <TextView
                android:id="@+id/txtPhone"
                android:layout_width="wrap_content"
                android:layout_height="wrap_content"
                android:text="13512345678"
                />
            <!--第2列-->
            <TextView
                android:id="@+id/txtaddr"
                android:layout_width="wrap_content"
                android:layout_height="wrap_content"
                android:text="山东省"
                />
        </TableRow>
    </TableLayout>
</LinearLayout>
4.Java代码
- SimpleAdapter设置数据
- 需要绑定
- 设置事件监听,点击的时候出现数据
public class Person extends AppCompatActivity {
    ListView listview;
    @Override
    protected void onCreate(Bundle savedInstanceState) {
        super.onCreate(savedInstanceState);
        setContentView(R.layout.activity_person);
//        获取listview中的信息
        listview=(ListView)findViewById(R.id.personListView);
//        设置列表信息
        /*
        * 上下文
        * 数据
        * 样式
        * map名称
        * 映射的名称
        * */
        SimpleAdapter adapter=new SimpleAdapter(this,getDate(),R.layout.listview_person_item,
                new String[]{"img","name","City","Phone","Addr"},
                new int[]{R.id.img1,R.id.txtName,R.id.txtCity,R.id.txtPhone,R.id.txtaddr});
//      设置适配器关联
        listview.setAdapter(adapter);
//      设置事件监听
        listview.setOnItemClickListener(new AdapterView.OnItemClickListener() {
            @Override
            public void onItemClick(AdapterView<?> adapterView, View view, int position, long id) {

//                显示的是全部的信息
                String result=adapterView.getItemAtPosition(position).toString();
                Toast.makeText(Person.this,result,Toast.LENGTH_SHORT).show();
                System.out.println(result);

//                显示的是局部的信息
                TextView text=view.findViewById(R.id.txtName);
                System.out.println(text.getText());
            }
        });

    }
    //要设置在适配器中的数据
    List<Map<String,Object>> getDate(){
        List<Map<String,Object>> list=new ArrayList<>();
        //造假数据
        Map<String,Object> map=new HashMap<String,Object>();
        map.put("img",R.drawable.person);
        map.put("name","张艳");
        map.put("City","长沙");
        map.put("Phone","13312345678");
        map.put("Addr","中国");
        list.add(map);
        map=new HashMap<String,Object>();
        map.put("img",R.drawable.person);
        map.put("name","李力");
        map.put("City","重庆");
        map.put("Phone","18512345678");
        map.put("Addr","中国");
        list.add(map);
        map=new HashMap<String,Object>();
        map.put("img",R.drawable.person);
        map.put("name","王丹");
        map.put("City","武汉");
        map.put("Phone","13012345678");
        map.put("Addr","中国");
        list.add(map);
        map=new HashMap<String,Object>();
        map.put("img",R.drawable.person);
        map.put("name","刘明");
        map.put("City","上海");
        map.put("Phone","13812345678");
        map.put("Addr","中国");
        list.add(map);
        return list;
    }

}